So Exactly What Do We Mean By “Traditional”? Part V

PART V: SHOOTING A TRADITIONAL FIREARM

“Traditional” applies as well to how I use the stuff. I would like to be able to carry my rifle, load it, shoot it and clean it in a way that simply wouldn’t cause anyone to do a double take back in the19th century. Of course, since I don’t own a time machine, all I can do is speculate. But I can also read every primary source I find, handle and shoot as many original guns as possible and try things out in the field to see what really works. Having done that for nearly forty years, I’d like to offer some observations about traditional firearms shooting.

Some serious misconceptions turn people off to black powder shooting. They think the loading process is dangerous and complicated. They don’t believe patched round ball loads are accurate or effective enough for hunting. They think that the clean-up process is messy and time consuming.   Andy and I started the Ruxton palaver precisely to dispel some of these misconceptions.

Let’s start with a few facts and tips about historical loads.

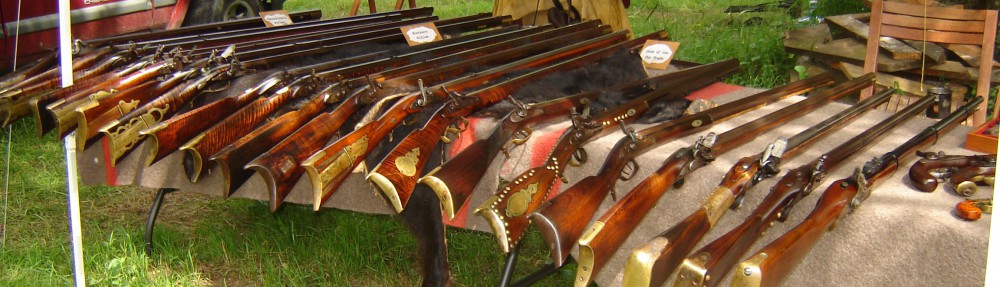
A patched round ball was the projectile of the American long rifle. That includes the plains rifle. There are accounts of a New Mexico hunter loading his “St. Louis Rifle” with a long, conical bullet, but his contemporaries viewed that as an oddity. Bullets existed, but they were used mostly in late 19th century target shooting. Frontier rifles had slow twist rifling designed to stabilize a round ball.

Patching was a personal choice. My own belief is that frontiersmen used whatever scrap cloth material they had on hand, lubricated with saliva or some kind of natural grease. Primary sources talk a lot about the number of “balls to the pound” rifles “threw”. They even occasionally mention powder charges. But I have never read a period reference to patch thickness or composition. Later commentators wrote at length on the subject, but the old timers never really mentioned it. Nor have I ever seen bottles of patch lube or packages of pre-cut, pre-sized lubricated patches listed in the ledger books of any period fur company.

Rifles had to be easy to load. Frontiersmen relied upon them for survival so it is logical     to assume that balls were patched loosely enough for smooth, quick loading. Does loading a tightly patched ball with a short starter give a shooter better accuracy? Absolutely. But just how much better, compared to the time it takes to load such a tight ball and the risk that the ball might jam halfway down a dirty bore?

Andy loads much tighter than I do. Years ago he purchased a quantity of pre-cut, .015” thick, round lubed patches which he has since been trying to use up. Occasionally, due to variations in ball size, he is forced to load with a short starter. I on the other hand, tear off a rough square of worn out linen dish towel of unknown thickness, wet it in my mouth, thumb press it with the ball into my rifle’s bore and push it down easily with my ramrod. I shoot a pretty loose load.

There is no question that Andy shoots tighter groups on paper than I do. But Andy is also a much better shot! When we go out in the field and experiment taking practical shots at life sized targets, I am able to “make meat” just as often as he does. Further, I have cut the playing card, put out the candle flame, done the “axe split” and hit the long range gong with my loose loads. Actually, there is very little difference between how well I shoot my loosely patched round balls through a muzzle loader and how accurately I can shoot a modern cartridge rifle. If I miss, I chalk it up to my poor shooting skill, not my loose load. My style of loading seems to work even better in original rifles with deep, slow rifling. So I have concluded that frontiersmen didn’t fuss a lot over patching. They loaded looser than shooters tend to load today because it was easy, convenient and accurate for most practical situations.

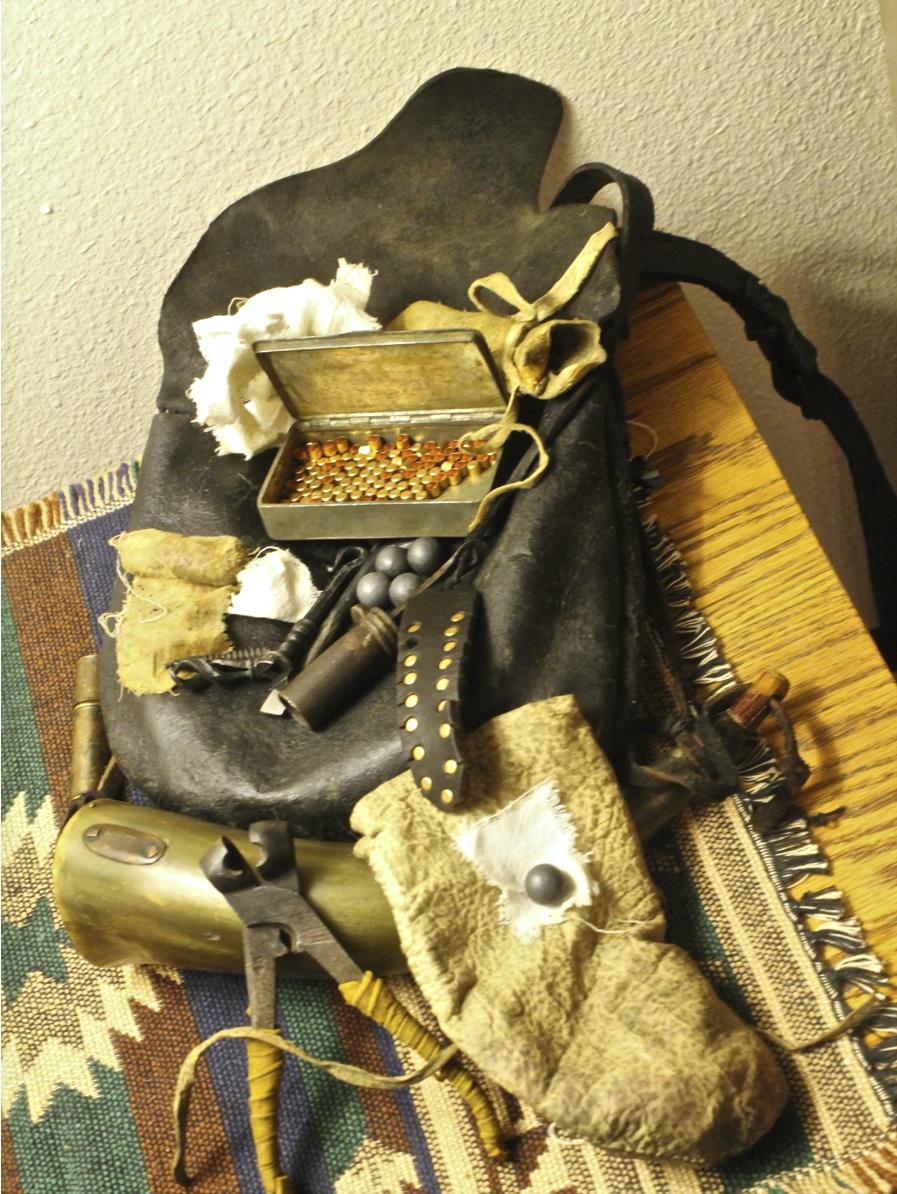
Priming powder works great but simply isn’t necessary. Madison Grant’s book The Kentucky Rifle Hunting Pouch illustrates around 35 shooting outfits attributed to the flintlock period, six of which have two powder horns. We assume one horn in each set was a priming horn.

Period black powder was coarser than it is today so a shooter would have needed to grind his own priming powder. This could have been done, but I don’t believe it was done very often. The increased ignition speed priming powder gives you simply isn’t worth the effort of grinding it.   Our experience has shown that a flintlock fusee loaded with shot and primed with FF powder ignites fast enough to reliably break clay birds in the air. In fact, just last weekend Andy did a flintlock demonstration with his trade gun which ignited instantaneously primed with FG cannon powder! Musket shooters using paper cartridges prime with coarse powder all the time. Bottom line, you don’t really need to carry a priming horn to shoot a flintlock. You can if you want to, but it really isn’t necessary.

Powder charges. A traditional formula is to start with your rifle’s caliber in grains of FFG powder. (45 grains of powder for a .45 caliber rifle) Increase the charge by about 2/3 for hunting and fine tune on the range for best results.

It’s much easier to load a longrifle than to describe the procedure in writing. The process is actually no more complicated than handloading a modern cartridge and definitely more forgiving. Andy told me he once found a website that described over a dozen loading steps. I can believe that. But imagine how many steps you’d need to describe riding a bicycle. Let’s see if I can shave off a few steps and still explain how the old timers did it.

  1. Clear the ignition Pick the vent, blow down the barrel, and perform whatever ritual you do to make sure your main charge will ignite.
  2. Unplug your horn, take out your powder measure and measure a standard charge of powder.
  3. Pour the powder down the barrel and re-plug your horn.
  4. Place a lubricated patch over the muzzle. This may involve taking a pre-cut, pre-lubed patch from your rifle’s patchbox or your shooting bag OR cutting a piece of patch cloth and lubricating it with grease or saliva.
  5. Take a ball out of your shooting bag and thumb press it into the patch and into the muzzle.
  6. Withdraw your ramrod.
  7. Holding your ramrod very short, seat the ball an inch or two into the barrel, then push it down to the powder with a series of short strokes.
  8. Replace your ramrod.
  9. Half cock. Prime the pan – after checking that your flint is still tight and sharp. I wipe off the frizzen with my thumb, but that may not really matter. It’s just part of my ritual. Be sure to re-plug your horn. OR, cap your percussion rifle.
  10. If you have set triggers, now’s the time.
  11. Full cock. Present. Aim and fire. For me, those steps constitute a single, flowing motion.

Well, that comes pretty close to a dozen steps. A couple less for a caplock. More important, with just a bit of practice those steps can be comfortably executed in between forty seconds and a minute. Give some thought to speeding it up if you’re under fire or being charged by a wounded buffalo.

Respectfully submitted,
Dave

So Exactly What Do We Mean By “Traditional”? Part IV

PART IV: INSIDE THE SHOOTING BAG

So what goes into a shooting bag? The contents need to be very carefully considered and arranged for maximum efficiency. You need to carry enough supplies to shoot at the club or hunt for a couple days, effect an occasional field repair and do one or two superficial cleanings. It was the same with the old timers. They left the bulk of their gunsmithing supplies in camp and brought only enough with them to keep their rifles working for the few days they were out on their own.

It’s fun to imagine the kinds of tools and supplies the mountain men did have access to back in camp. Osborne Russell and Nate Wyeth both talk about percussioning rifles out in the mountains, hundreds of miles from the nearest workbench. Fremont repaired the glass on his barometer somewhere up in the Wind River Range. Apparently the brigades brought specialized tools with them, but that equipment wasn’t carried around every day in shooting bags. As much as I’d love to start speculating about the minimum inventory you’d need on hand to percussion a rifle in the Absoroka Mountains of the 1830s, I think I’d best re-focus for the time being on what goes into a shooting bag. Here is a list of items typically found in original bags, along with a few suggestions:

  1. Powder measure and pick or capper tied to the shoulder strap with a thong, but tucked into the bag.
  2. Small, accessible pouch containing a couple dozen or so round balls. It’s nice if that pouch has an opening that can conveniently dispense one ball at a time.
  3. Tin of greased patches and/or enough patch cloth to meet your shooting and cleaning needs. I carry about three 2-1/2 foot long torn strips of linen, each around 1-1/2 inches wide and a small, rolled up strip of greased patch material. If your patching is more than .01” thick, you should think about carrying a patchknife.
  4. A tin of caps or small pouch containing three to six replacement flints.
  5. Small turnscrew with an end massive enough to knap the edge of a gunflint if you have a flintlock. Add a compact, hopefully period style nipple wrench if your rifle is a caplock.
  6. Cleaning worm and minimal cleaning supplies
  7. A small container of grease and/or a compact oiler

Even with a small shooting bag, you should still have enough room for optional items like some leather or sinew scraps for repairs, tow for cleaning, maybe a fire starting kit or even a pipe and some tobacco. Personal items were often found in old shooting bags. I can see a frontiersman carrying a small book of Psalms, a journal and a pencil, a razor, eyeglasses or a compass. Not all of those things along with your shooting supplies in one bag! But there should be room enough for the odd personal item. My “big bag”, which is still much smaller than most modern commercial bags, has room for all of my shooting stuff plus a compact, original folding telescope and a copy of Henry V . I can even throw in a couple landjeagers or pieces of jerky if needed.

Notice that I repeatedly use adjectives like small, compact, convenient and accessible. The trick is to be efficient about what you carry. So it was back in the day.

Bag Contents

Contents of a traditional shooting bag: (Top to bottom) small buckskin tool pouch, snuff box containing caps, rolls of greased patch cloth, strips of untreated patch cloth, worms, nipple wrench and turnscrew, balls, adjustable iron powder measure, leather capper, grease tin, original powder horn with copper repair, ball mold, ball and patch, leather bullet bag.

Respectfully submitted,
Dave


So Exactly What Do We Mean By “Traditional”? Part III

PART III: TRADITIONAL ACCOUTREMENTS

Powder Horns:

(photo pending)

Here, less is truly more. When I started in this hobby, I simply couldn’t live without an artistically engraved powder horn decorated with moldings, facets, fancy turned stopper and plug – all the bells and whistles. Today, my horns look more like something dragged up from the bottom of a box in the corner of a dusty, old antique store. Most of the time, they are.

Decorated powder horns are an art form of their own. The question is, if you own a common man’s rifle, is it appropriate to service it with an aristocrat’s powder horn? Frontiersmen embellished their horns, but usually in a folk art style that can be hard to duplicate. When in doubt, you can never go wrong with something like “J.Smedlap” or “JS His Horn” scratched with the tip of a pocket knife. Expressions like “Pike County”,“MY COUNTRY”or “Ohio”can be a nice touch. Try not to embellish your horn with 21st century sentiments.

Study period decorative motifs. Pay close attention to the styles of original powder horn pouring spouts and plugs. Study how the old horns were attached to shooting bags. You’ll notice that a lot of what you see on the market doesn’t quite look like what you see in the books.

Finally, consider using an original powder horn. There are plenty available in antique shops at prices not much different from modern replicas. I’m not talking about carrying a priceless antique around on your shooting bag. If an old horn is a work of art it probably should be on display in a museum or on your mantle. But there are plenty honest old powder horns out there, correctly made and still able to hold powder. Using an old horn adds immeasurably to the authentic look of your outfit and is a great way to display and give new life to a small piece of American history. Never decorate or embellish an original horn. Fix it if necessary, but don’t change it.

Shooting Bags:

(photo pending)

It’s hard to find a commercial shooting bag with the correct “look”. They’re usually too large, over decorated and incorporate rivets, grommets, pockets, gussets, fringe, machine stitching, leather lacing, modern finishes and cloth straps connected by metal rings. Examples of all of these features did exist in the past, but hardly ever in forms resembling what we see today.

If you decide to make your own shooting bag, The Kentucky Rifle Hunting Pouch should be your Bible. I strongly recommend using a separate flap piece secured to your bag with a wrap stitched, outside seam. That style flap is really weather proof and stays closed so well that you may question whether or not you even need a button or buckle to secure it. With the correct applications of stain, even spray paint, varnish and wax, it is possible to create a finish on your shooting bag that will make it look like something that just came out of a museum!

Even with a small shooting bag, you should still have enough room for optional items like some leather or sinew scraps for repairs, tow for cleaning, maybe a fire starting kit or even a pipe and some tobacco. Personal items were often found in old shooting bags. I can see a frontiersman carrying a small book of Psalms, a journal and a pencil, a razor, eyeglasses or a compass. Not all of those things along with your shooting supplies in one bag! But there should be room enough for the odd personal item. My “big bag”, which is still much smaller than most modern commercial bags, has room for all of my shooting stuff plus a compact, original folding telescope and a copy of Henry V . I can even throw in a couple landjeagers or pieces of jerky if needed.

Notice that I repeatedly use adjectives like small, compact, convenient and accessible. The trick is to be efficient about what you carry. So it was back in the day.

Jim Bridger’s tackle box hung from a leather strap over his shoulder. It was called a “bullet pouch” back then. Its contents were organized for absolute practicality and efficiency. A good shooting bag fits like a glove. It doesn’t bounce around on a galloping horse or catch on branches in the woods.

Period shooting bags often had “hardware” hanging from leather thongs attached to the shoulder strap. Those items were kept tucked away inside the bag. Objects weren’t allowed to just dangle around and snag on things. Period items attached by thongs to shooting bag shoulder straps included:

  • A powder measure
  • A bullet board containing three to six lubed, patched balls
  • A sewing awl (probably to function as a vent pick)
  • A pan brush
  • A capper

I don’t recommend having a lot of objects dangling from your shoulder strap. Keep it down to a powder measure and maybe a vent pick or capper.